
Plex
So for those of you who don’t know Plex is a streaming media service and a client-server media player platform, made by Plex, Inc. The Plex Media Server organizes video, audio, and photos from a user’s collections and online services, and streams them to the players.
Most of everything in my home lab has been built to support Plex which is awesome, I get to do things with containers and learn docker, VMs, and expand some Linux knowledge all while serving an actual purpose.
So now that you know what Plex is and why I use it, how do you install your own? I’ll walk you through step by step below.
- System Requirements
Now keep in mind this will be different for everyone. If you have 30 people streaming you’ll need a lot of power behind it. Here’s what Plex recommends.
- Operating System
This plays a huge role in the performance of your server. I’m a little biased and believe everything runs better on Linux. The supported OS list can be found in the System Requirements link.
Linux Install
For my install, I’ve chosen Ubuntu 20.04
- Step 1 Before I do anything in Linux I like to run updates and do a reboot
1
sudo apt update && sudo apt upgrade -y
1
sudo reboot
- Step 2 Add Plex Repos
1
curl https://downloads.plex.tv/plex-keys/PlexSign.key | sudo apt-key add
1
echo deb https://downloads.plex.tv/repo/deb public main | sudo tee /etc/apt/sources.list.d/plexmediaserver.list
- Step 3 Update Packages and Install Plex
1
2
sudo apt update
sudo apt install plexmediaserver
- Step 4 Verify Plex is running
1
sudo systemctl status plexmediaserver
The output should look something like this

- Step 5
Now we need some directories to store our content. Note: Movies and TV shows cannot share a directory due to how Plex needs them named. Ex. TV shows need something like S01E01
1
sudo mkdir -p /opt/plexmedia/{Movies,TV Shows,Anime}
- Step 6 Change permissions for those directories
1
sudo chown -R plex:plex /opt/plexmedia
- Step 7 Give your server a static IP
This is optional but I highly recommend it.
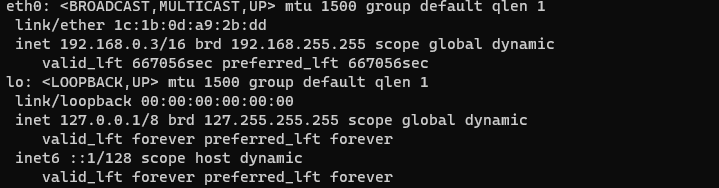
Check your current IP by running the following command
1
ip a
Should look something like this. Take Note of your current IP in my case 192.168.0.3 we’ll use this later.
Make a backup of your current config
1
sudo cp sudo nano /etc/netplan/00-installer-config.yaml 00-installer-config.yaml.bk
Edit the network config
1
sudo nano /etc/netplan/00-installer-config.yaml
Inside that file, it will look something like this you can remove everything so it’s a blank doc.

You can paste this template to use for a static IP notice for addresses under my nic (enp37s0) I used the IP we noted earlier.
1
2
3
4
5
6
7
8
9
10
# This is the network config written by 'subiquity'
network:
  ethernets:
    enp37s0:
      addresses: [192.168.0.3/24]
      gateway4: 192.168.0.1
      nameservers:
        addresses: [8.8.8.8, 8.8.4.4]
        search:
  version: 2
Once you paste this in save and exit ctrl+x then y
Now we can apply out changes with
1
sudo netplan apply
- Step 8 Go to your server UI if you followed along the address to your server will be as follows if you didn’t assign a static you can run the “ip a” command to find your ip.
http://192.168.0.3:32400/web
That’s it Plex will walk you through setting up your libraries and when you add media to the directories we created you can now stream and enjoy!!!
Docker Install
We’re going to do this using Docker Compose. This part of the guide does assume you know a little about Docker, have it installed, and use Linux. You can adapt the steps and follow along on Windows just note creating your directories.
For this install, I used Linuxservers Image on Docker Hub.
- Step 1 Make Plex working and media directories
1
sudo mkdir -p /home/plex/plexmedia/{Config,Movies,TV Shows,Anime}
- Step 2 Change directories to config and create compose file
1
cd /home/plex/plexmedia/Config
1
sudo touch docker-compose.yml
- Step 3 Add config to our compose file. You can use the template below.
1
sudo nano docker-compose.yml
Paste the following template
1
2
3
4
5
6
7
8
9
10
11
12
13
14
15
16
17
18
19
20
---
version: "2.1"
services:
  plex:
    image: lscr.io/linuxserver/plex:latest
    container_name: plex
    network_mode: host #(optional if you want to specify port change this to bridge)
    environment:
      - PUID=1000
      - PGID=1000
      - VERSION=docker
      - Port=32400:32400 #(optional if specifying ports)
      - PLEX_CLAIM= #(optional but required if specifying port)
      - NVIDIA_VISIBLE_DEVICES=all #(optional if passing through gpu)
    volumes:
      - /home/plex/plexmedia/Config:/config
      - /home/plex/plexmedia/TV Shows:/tv
      - /home/plex/plexmedia/Movies:/movies
      - /home/plex/plexmedia/Anime:anime
    restart: unless-stopped
ctrl+x then y to save and exit
- Step 4 Start our container and verify it’s running with the following commands.
1
sudo docker-compose up -d
1
sudo docker ps
- Step 5 Once you’ve verified the container is built and running let’s go to the Plex UI
http://your.servers.IP:32400/web
That’s it Plex will walk you through setting up your libraries and when you add media to the directories we created you can now stream and enjoy!!!
Windows Install
Installing Plex on windows is straightforward. However, I would highly recommend if you’re going to have more than 2 simultaneous streams at once I highly encourage you to look into Linux.
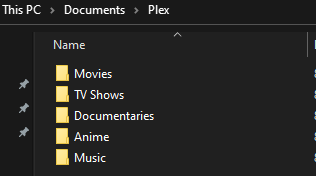
- Step 1 Make media directories
Under your Documents folder create a folder called Plex inside of Plex add one for TV Shows, Movies, Music, etc… These can be named whatever you want. The only requirement is Movies and TV Shows cannot share a directory.
- Step 2 Assigning a Static IP
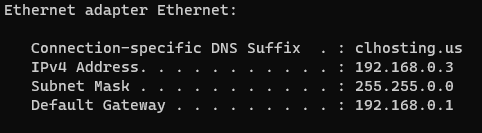
First, let’s find our current IP
-
- Click Start and search command prompt
-
- Type ipconfig and hit enter you should see something like this
-
- Take note of this info we will need it.
This is optional however I highly recommend it.
-
- Click Start and search Network Settings
-
- At the top right click change adapter options
-
- Right-click on your ethernet adapter and go to properties
-
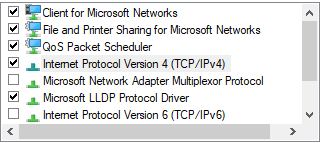
- Find Internet Protocol Version 4 double click

-
- Click on the use the following IP and enter the info we found previously
-
- For DNS add Google’s 8.8.8.8 and 8.8.4.4
-
- Click ok and apply ***
- Step 3 Download Plex Server
You can download the exe here. Once you download it and install it will be running in the background you should see the plex logo in your icon tray. To configure we will need to go to the web UI.
http://your.servers.IP:32400/web
That’s it Plex will walk you through setting up your libraries and when you add media to the directories we created you can now stream and enjoy!!!